Why the Core3D printer uses CoreXY

After reading this, please consider supporting me at GoFundMe

The Core3D printer was implemented using CoreXY as its method of motion. When I first learned about it, it reminded me of my etch a sketch. I realize, not the best founded reason for approaching something new.

The other most common methods are Delta and Cartesian. Not sure Cartesian is the right name for one of them as all methods apply to X, Y and Z coordinates. I don’t don’t  René Descartes had in mind how motors would operate to reach X=0, Y=0 and Z=0.

Let look a bit closer at all three methods.

Cartesian

The most common method in the world of 3D Printing is referred to as Cartesian motion. An example of this would be the Original RapRap implementation. Each axis has it’s own dedicated stepper motor(s). One for the X-Axis which travels up and down along the Z-axis. One Stepper motor for the Y-Axis which in case of the Prusa pulls the bed back and forth and 1 or 2 stepper motors for the Z-Axis which in this case lifts the entire X-Axis.

source adapted image

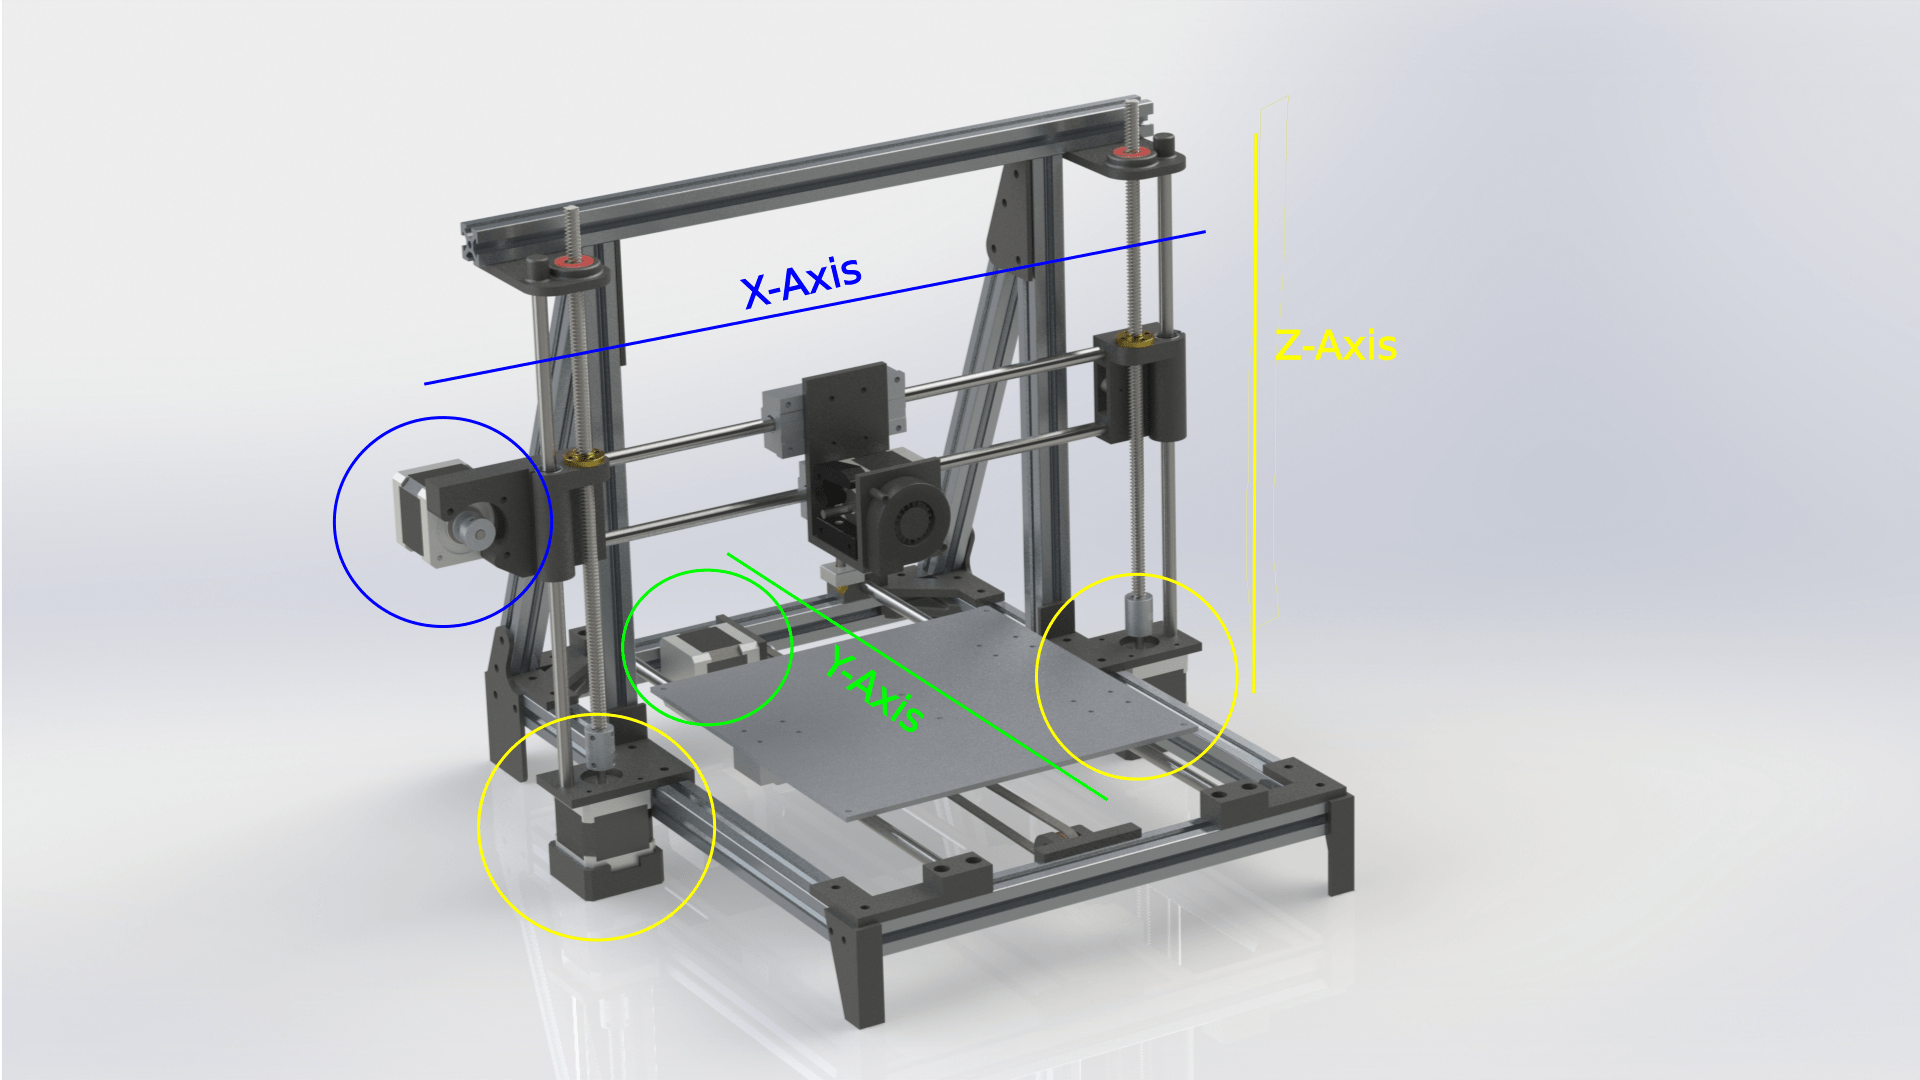
This method is the default implementation for the Marlin Firmware which operates a large portion of the 3D printer world.

Delta

The Delta 3D printer uses a completely different mechanism. The extruder head is controlled by 3 arms that move up and down their own (parallel) rails. The software calculates the proper movement to come to X, Y and Z coordinates.

source image

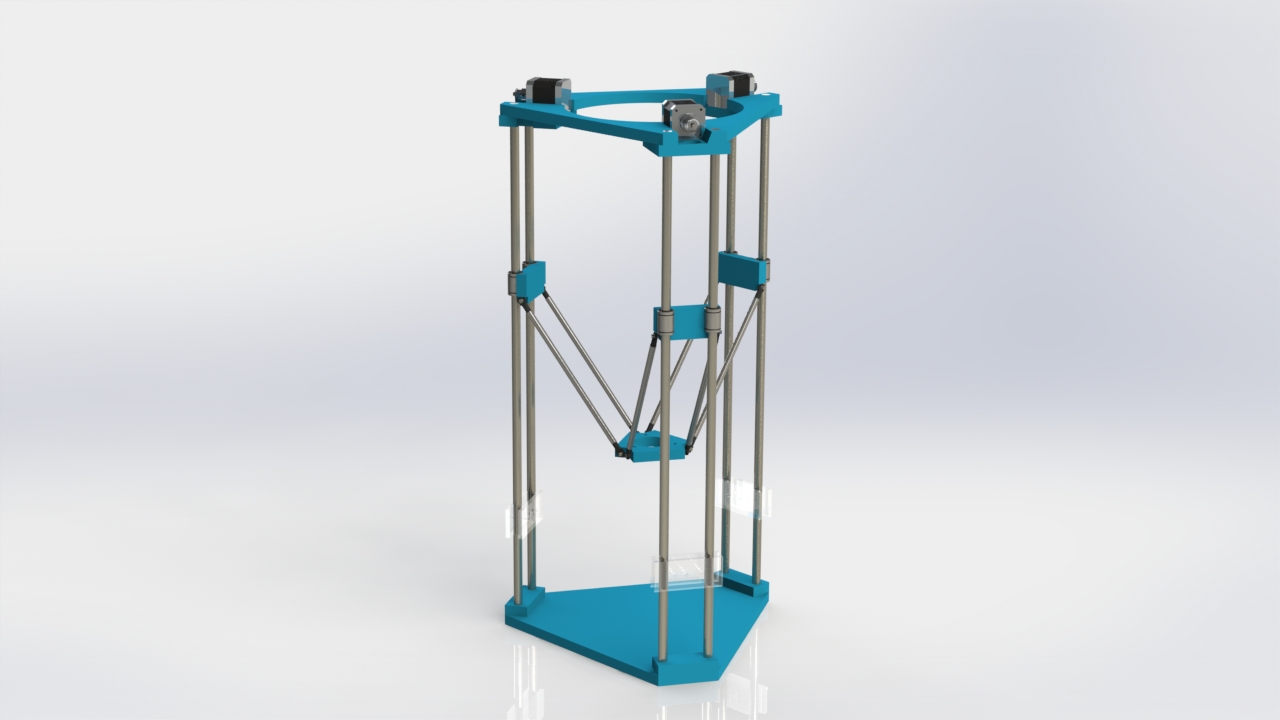
In the printer above three stepper motors all move in parallel but independently (up and down). The Delta printer is probably the second most available printer. From what I’ve read, trouble shooting is not as straight forward as the motion is is much less intuitive than the standard “Cartesian” motion.

Core XY

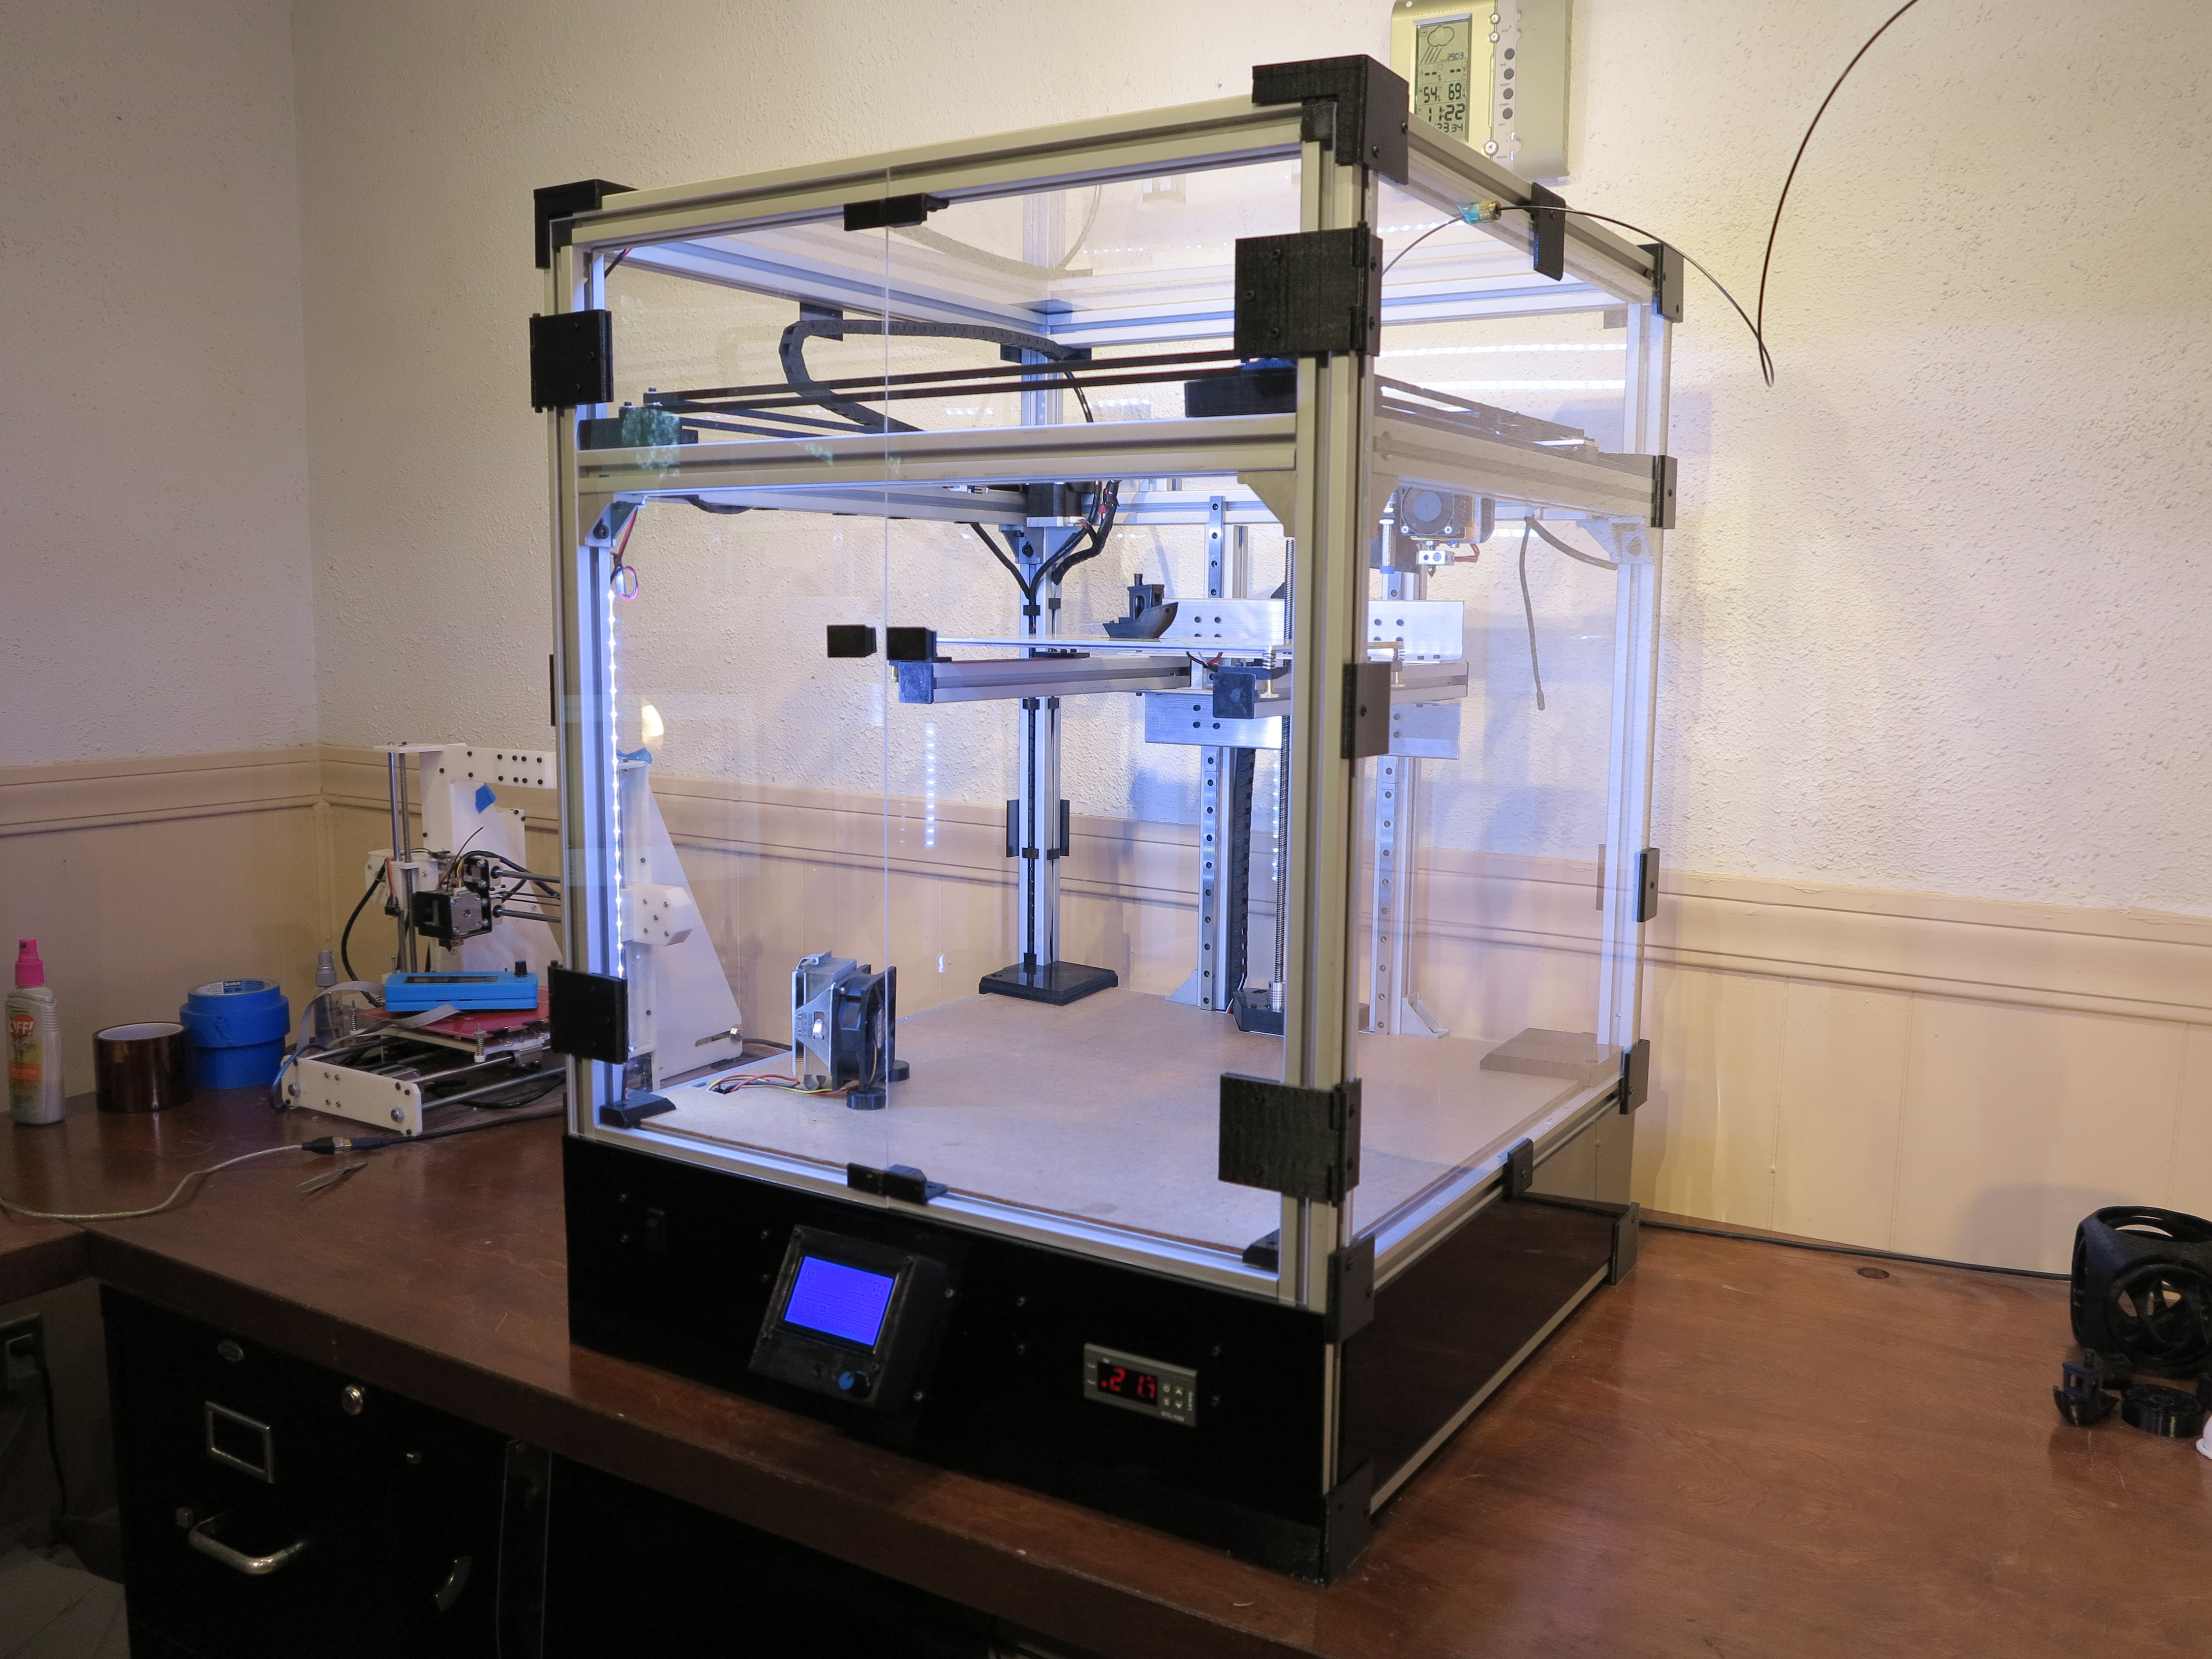
Less common, although seemingly on the rise is the Core XY motion. The best way to explain Core XY is to refer to coreXY.com but lets use the Core3d printer as a reference here.

Core3D Printer CoreXY design

X and Y are controlled by two stationary  stepper motors. Neither motor is dedicated to a single axis, instead the firmware will use the motors in tandem to reach the different X and Y coordinates.

Don’t worry about the math: Marlin Firmware takes care of all of this but in case you’re interested:

ΔX = 0.5(ΔA + ΔB), ΔY = 0.5(ΔA – ΔB), ΔA = ΔX + ΔY, ΔB = ΔX-ΔY

In the case of the Core3D printer, the Z-axis is controller by a single stepper moving the bed up and down.

Core3D printer X/Y/Z assembly using CoreXY

The nice thing about all these mechanisms of motion is that you don’t have to figure it out. CoreXY is much less intuitive than the normal “Cartesian” but as far as I’m concerned it is just a configuration in the Marlin software. I’ll write a more detailed post on the configuration.

So why Core XY for the Core3D printer?

I’ll be real honest here, I could have gone with ordinary Cartesian like the Prusa but why settle for ordinary? My primary goal was to create an enclosed printer with lots of bells and whistles.

The anecdotal word on CoreXY is that:

  • it is more accurate. The fact that both stepper motors are stationary adds to that accuracy . In most 3D printers, one stepper motor moves the entire bed (which, with high builds and high speed, can introduce wobble). In the Cartesian implementation, the motor controlling the X-axis moves up and down with the Z-Axis (be it very small increments each layer) and the Z-axis lifts the entire X-axis installation. It is important to note that this accuracy depends a lot on the weight of the extruder assembly and sturdiness of the frame it sits in.
  • It can operate faster.  Yes, I can run the head back and forth at 10,000 mm/sec but that doesn’t make it accurate. As a matter of fact, I don’t think extruders can even handle that type of speed.
  • The bed doesn’t move along the Y-axis (stationairy on delta as well) so that makes for more stability. In General the bed moving around isn’t that much of an issue as long as it is light enough. When you move to metal bed, not to mention bigger prints, weight can start becoming an issue moving back and forth that fast.

I have a feeling, proponents of the other types of motion will argue or put forth similar points to defend their methods. I’m tempted to create a second version of my printer and have it implement the Cartesian motion for X and Y (I would leave the Z-Axis as is).

I thought about doing something with delta but I was put off by some of the comments around difficulty with troubleshooting. It also feels to me like the 3 spindly arms can’t withstand much force.

I went with CoreXY as, personally, I think it’s more elegant. It’s not forced to move clunky (in some cases) heavy stepper motors and extruders around. That said, the Core3D printer can actually use some improvement there, as the current construction of the extruder/brackets/inducer still ended up quite heavy.

Core3D Extruder assembly on CoreXY
Current Core3D extruder assembly

One of my next updates will be that of reducing the size and weight of the extruder assembly.

Upgrading the MK2A bed from 12 Volt to 110 Volt

For starters, everything I write about down below involves electricity. Working with electricity is dangerous. Do this at your own risk!!!

MK2a 300×200

Haha, first blog post about my brand new printer and I’m already upgrading, that’s what happens as you learn as you go. The first implementation for the heated bed on my Core3D printer was a “standard” 200x300mm MK2A bed with Borosilicate Glass,   purchased on Ebay. It worked fine for PLA but the intent of the Core3D printer was to print with ABS and if possible with a bed temperature of 110 C (still experimenting on whether that is the best temperature).

Original MK2a bed

The original bed took 12 minutes to get to 60C and I never even tried to get to 110C. It pretty much maxed out at 78 (even inside closed chamber). 12 volts for a 200x300mm bed simply does not seem to do it.

Faster hot and hotter

I needed faster and better heating so I decided to install a 110 volt heated bed. I figured it would get hotter and it would get hotter faster. It worked out. It gets HOT and it gets hot FAST  (See video below).

The other thing I recently changed was from a fixes Z-endstop to Auto Bed Leveling. The “old” Boro glass would not do for Auto bed leveling as it requires metal to detect so a new aluminum bed it was.

Original adjustable Z endstop designed in Fusion 360
Bed leveling Inducer, replacing Z-Endstop


For the aluminum bed, I chose the RepRap Champion 300x200mm Aluminum Heated Bed Build Plate 3D Printer RepRap Prusa i3 Upgrade Kit from Amazon.com.
For the heater I got the 200 X 300mm (8 ” x 12″ approx.) 110V 600W, with 3M PSA & NTC 100K thermistor, KEENOVO Silicone Heater Mat/Pad,3D Printer HeatBed

Pretty sure it came from China as it took over 2 weeks to arrive.

Since the Core3D currently uses RAMP 1.4 and the board puts out 12 volts for the bed, I also needed something to allow for the 110Volt bed so for that I installed a Solid State Relay. For this I got the uxcell SSR-25 DA 25A 3-32V DC / 24-380V AC Solid State Relay + Heat Sink 


Wiring the new bed

The wiring is fairly simple, yet a little intimidating. Practically everything on the Core3D (except for a chamber heater) is running at 12 Volt. It does not hurt when you touch the wrong wire running 12 Volts. 110 Volt DOES hurt. be careful. If you’re in Europe: 220 Volt HURTS EVEN MORE!!

I’ll be honest even now that it is all wired up, I have every intention to have someone with an electric engineering degree to look things over. When soldering some wire (printer was turned off but plugged in) I got a nasty zap when the solder iron touched the load wire. It shouldn’t have. To date I’m not sure it’s the printer or the solder iron that is defective (more on this later).

Applying the silicon heater to the bed

Be warned, I screwed up on this one (somewhat). The silicon heater I got came with the factory applied adhesive backing. First, clean off the surface to which you will apply the silicone heater. Make sure there is no dirt or grease on the plate. Next peel off the adhesive backing paper partially. It’s suggested you start at the opposite site from the wiring. You’re supposed to do this at an angle, possible with a roller of some sort.

WARNING: YOU ONLY GET ONE CHANCE!!!

I followed the instruction but was so focused on making sure there were no bubbles, I lost track of the alignment. My bed ended up somewhat crooked on on the aluminum bed. I was lucky it stayed within the bounds of the screw holes, but I didn’t miss them by much. You really only get one chance. I tried slowly backing out but the adhesive started separating from the silicone. I quickly back off from that. Everything, I’ve read seems to indicate that once you loosen the silicone, you’ll need to remove all glue and apply new one of your own. A messy procedure to say the least.

Am I happy?

Yes, I am. I love the aluminum bed and the fact that it allows me to use Auto Bed Leveling. The silicone pad looks fine, even though it got on a little crooked and it heats fast and gets hot. As a matter of fact the bed now heats faster than the hot-end.

new silicone heater
New Aluminum bed with already used Kapton tape

The bed heats up from 20C to 110C in 1:27 minutes (see video below at 4x speed). My old bed never made it past 78C and that took at least 15 minutes.

video is running at 4x speed

We’re not done yet

It’s been stated elsewhere that using the thin aluminum bed is not the best medium for this type of heater. It tends to warp as you heat it. I have not noticed this yet but it might be that the auto leveling is compensating for it.

What I definitely miss is the glass plate I can remove, treat and handle externally from the printer. For this reason I’ve ordered a second aluminum bed that I can lay on top (using the old paper clips). Once I get it, I’ll need to figure out if simply laying it on top will suffice or if warping of the bottom plate prevents proper contact. I’ll keep you posted on that.

Please note: I’m an affiliate to several vendors. Some of the products above link to the actual items from the vendors I purchased from. Do me a favor and use these links to purchase your items, I get a little kick back. Building 3D printers costs money.